|
|
Bill Coster Newsletter 3Hopefully when you receive this newsletter it will be from Bill Coster, rather than fgfgfg like the first two. I tracked down the source of this technical problem and resolved it, so hopefully your email system won’t identify the newsletter as being from a dubious source and divert it to your junk mail folder. Of course not everyone may think this is a good thing……………….
Since I returned from Shetland I’ve spent most of the time sitting in front of my computer processing the images from Shetland. Digital has so many advantages over film, but the amount of time required to process the images is one of the downsides of the medium and sits there right beside dust on the sensor. I reckon I probably spend slightly more time processing the material than I do taking it. Thus a months shoot in the Shetland took about 5 weeks to finish processing at home. This time starts with the secondary editing (i.e deleting!) and finishes with sending the tiffs to my primary agency on a DVD.
I did manage to get out during the July heatwave as I wanted to visit Minsmere. At this time of year the Avocet chicks are wandering around and the adults get very aggressive towards other birds, so I was hoping for some action. When I arrived I was surprised to find the scrape almost dry and the only Avocets visible were in the distance. As the water levels at Minsmere are controlled I thought this location would be OK, but obviously the drought was so bad that keeping the water levels up was not possible this year.
Birds Illustrated MagazineDon’t forget – You cannot consider yourself a bird photographer if you don’t subscribe to Birds Illustrated magazine. To subscribe contact Buckingham Press on 01733 561739. Mention my name and they will send you a free sample copy. I’ve heard people have complained because Birds’s Illustrated includes images from painters as well as photographers. Notice I said painters and not ‘artists’. For too long photography has been considered the poor relation to painting and having both art forms in one magazine can only raise the profile of photography. Besides, I find that because of the freedom and time that painters have, they are able to concentrate on composition, which is often very strong and photographers can learn from this.
ShetlandAs advertised, here are a few images from my Shetland trip in June. I only put a few images in each newsletter as I don’t want it to get too large and cause problems like filling up peoples inboxes and taking ages to display on the screen.
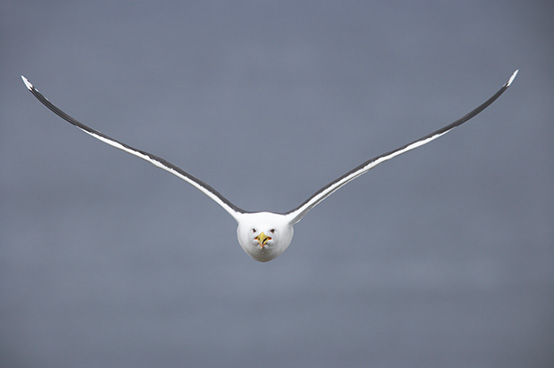
Great Black Back Gull – In FlightNoss Nature Reserve
1/1250th second at f5.6, Canon 1Ds II, 400mm + 1.4x (400 ASA), Handheld
Whilst passing through the territory of a pair of Great Black Back Gulls, one of them decided to pay us a visit!
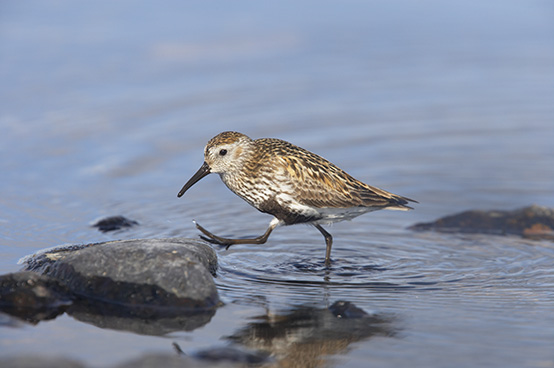
Dunlin Steping on RockFetlar
1/1000 second at f8, Canon 1Ds II, 400mm + 1.4x (400 ASA), Handheld
From the biggest bird to one of the smallest. Most Dunlin seemed quite nervous, but this one didn’t seem to worry about the presence of a 6’4” photographer.
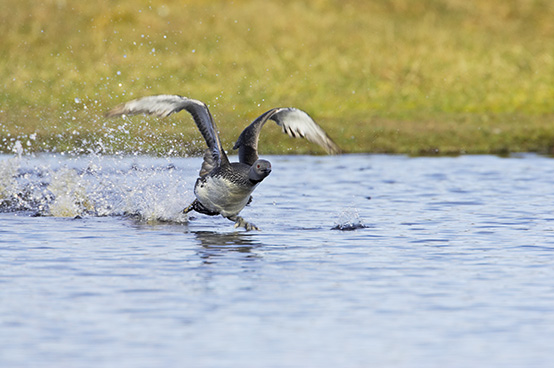
Red Throated Diver – Taking off from LochUnst
1/1000 second at f8, Canon 1D II, 500mm + 1.4x (400 ASA), Beanbag on car window
It came as a complete surprise when this Diver appeared on the loch as I was given the location as a place where Skuas came to bathe and we were waiting quietly in the car by the main road when a Diver appeared from nowhere. Good luck or what!
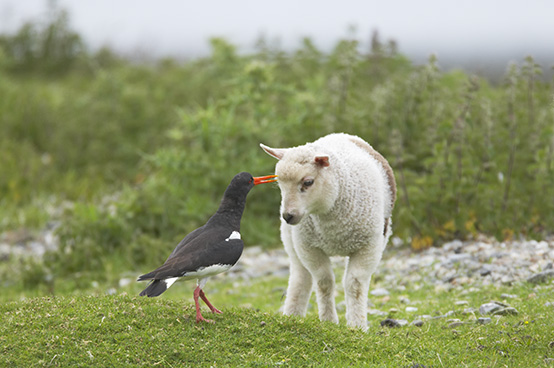
Oystercatcher and LambShetland Mainland
1/500 second at f5.6, Canon 1Ds II, 500mm + 1.4x (400 ASA), Beanbag on car window
The baby lamb just wanted to play, but with chicks nearby, the Oystercatcher was not in the mood for such trivial behaviour.
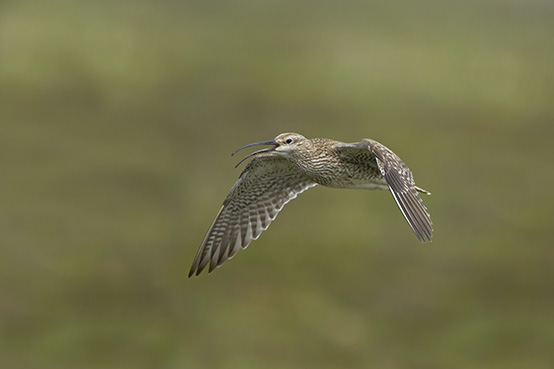
Whimbrel – Calling in FlightShetland Mainland
1/2000 second at f5.6, Canon 1D II, 500mm + 1.4x, Beanbag on car window
I found Curlews one of the most difficult birds to photograph as unlike many other waders they would often disappear as soon as you stopped the car. For once I managed to find a pair with chicks that didn’t seemed bothered by our presence and settled down to photograph them. Suddenly a bird appeared from a hundred yards or so away and flew straight at the car. It looked like another Curlew, but the call was different and by coming towards us instead of going away was certainly behaving differently. Suddenly realising what it was I framed and shot to get this picture – wonderful.
2007 Bill Coster Photo Tour – More Pictures for your Pound. Prices at last! Please email me for full details of the trips.
Griffon Vultures in Spain - £1,300 plus flight – 17th to 25th March 2007 A fantastic opportunity to get really close to feeding vultures. We will have privileged access to a WWF feeding station where no other groups can go. This year we had around 200 vultures turn up. I’ll include a few pictures in a later newsletter. This will be in the last week of March.
Extramadura - £1,300 plus flight – 10th to18th April 2007 Photograph Great and Little Bustards on their display grounds, plus Lesser Kestrels, Bee Eaters, White Storks, Montague’s Harrier and others. Many are hides set up specifically for us. It is illegal to photograph most of these birds in Spain without special permission. We have this permission. This will run in early April. Stop Press – Roller has now been added to this trip, with hides set up on breeding pairs. In the last couple of years the Rollers have been arriving early and assuming they do so again in 2007, we will have good opportunities to photograph this colourful bird.
Pantanal - £2,800 plus flight – 4th to 21st August 2007 This famous wetland region in Brazil has a riot of birds and other wildlife to photograph. There is a reasonable chance of Jaguar at a regular spot for this elusive species, Giant Otter should be quite easy as should Hyacinth Macaw and a wealth of other birds, including many species of Hummingbird, Guans, Storks, Herons etc etc. Should be a great experience.
Computer Bits
Editing and Safeguarding Images in the Field Whilst leading tours, I reckon I get more questions about this subject than any other. Now I’m not pretending this is an interesting subject, but as in many cases it’s the boring bits that often the most essential and getting them right can both speed up your workflow and make sure you don’t loose anything. Besides, the more efficient you are at these housekeeping chores, the less time they take!
The following is how I cope with things in the field. I’m not claiming that this is the best way to do things, it’s just the best I’ve found so far. I’m always looking for ways to streamline things and improve the way I do things. The procedure below is relevant when you are on a trip away from home for a few days or more. If I’m out for just a day, I just take lots of cards and hope I don’t fill them up! Anyway here goes…….
I only process RAW files whilst away on a trip. I do not convert to tif or carry out any processing. This keeps the file sizes to a minimum which is essential on a long trip (I regularly go away for 1 or 2 months at a time). I use Breezebrowser and Downloader Pro software to carry out the downloading and editing.
Whilst shooting I do not generally delete images in camera. I know many people do, but I consider this risky as you might delete the wrong image by mistake. Deleting images will also leaves ‘gaps’ on your card. These gaps will be of various sizes (depending on the image) and will slow down the write process as the software tries to find a suitable size gap in which to fit the next image. How significant the time delay is I’m not sure, but I’m not taking any chances. In the early days I once lost around 30 images (which I fortunately recovered later). The first image lost was immediately after an image I had deleted in camera. My rule for all things technical is keep it as simple as possible and deleting images in camera simply adds complexity.
After a session, the first thing I do is download all of the cards to my laptop. Using Downloader Pro, as soon as I insert the card the software boots up and asks me for a location. I type this in (Fetlar for example) and all the images downloaded from the card carry the location in their filenames – very useful for later when you are trying to remember where you took that prize winning picture.
After all of the cards have been downloaded, I then open Breezebrowser and display all of the images as thumbnails. I double click on the first one and then navigate through each image. Anything that is not sharp, out of frame or otherwise no good I delete at this stage.
Next I return to the thumbnail screen and select a few images (normally between 4 and 8) and then run a slide show of these with an interval of 4 secs. The slide show displays the image as full size on the laptop screen and you can judge critical sharpness much easier than on the first editing step. Remember or make a note of the images you want to delete and delete them when you return to the thumbnail screen. Continue with this until you have edited all the images. I have a rule that I only keep two images that are the same. If I have 6 similar pictures of a subject (A common occurrence when you are shooting at x frames a second), I will only keep 2. There is absolutely no point in keeping more. I only keep two because I want one RAW file as a backup should the other become corrupt or lost for some reason. I will often select the similar images and run a slideshow just on them to make my choice of what 2 to keep. This works well with relatively static subjects, but with action or flight I will often keep more. This is because I sometimes find that a subject that appears critically sharp on my laptop as a RAW file, is a little blurred when converted to tif and viewed at actual pixels.
OK, you now have your edited selection of images from the days session. I then store these in a folder on the laptop hard drive. I name the folder with the month and day thus – MMDD. I often edit twice a day, once at lunchtime and once in the evening. In this situation I add S1 or S2 to the folder name to represent Session 1 or 2.
Now I attach one of my backup hard drives. These are 60gb lacie portable drives. They are powered via the USB port of the laptop and weigh just a few ounces. They are about the size of a small cigar pack. I copy the folder I’ve created to the external drive. I then disconnect the drive and attach a second, identical drive and repeat the process. I now have 3 copies of each RAW image I’ve decided to keep.
Only at this point do I then format all of the cards and I’m ready for the next session.
Once I have accumulated around 4gb of data I will write a DVD and post it home (assuming this is possible – bit tricky on a ship in Antarctica).
Well I do hope at least some of you have found this useful and haven’t fallen off to sleep…………………………
Regards
Bill Coster (visit www.billcoster.com)
|
|
[Home] [Photographic Tours] [Custom Prints] [Slide Lectures] [Galleries] [Newsletter Archive] [Newsletter 1] [Newsletter 2] [Newsletter 3] [Newsletter 4] [Newsletter 5] [Newsletter 6] [Newsletter 7] |